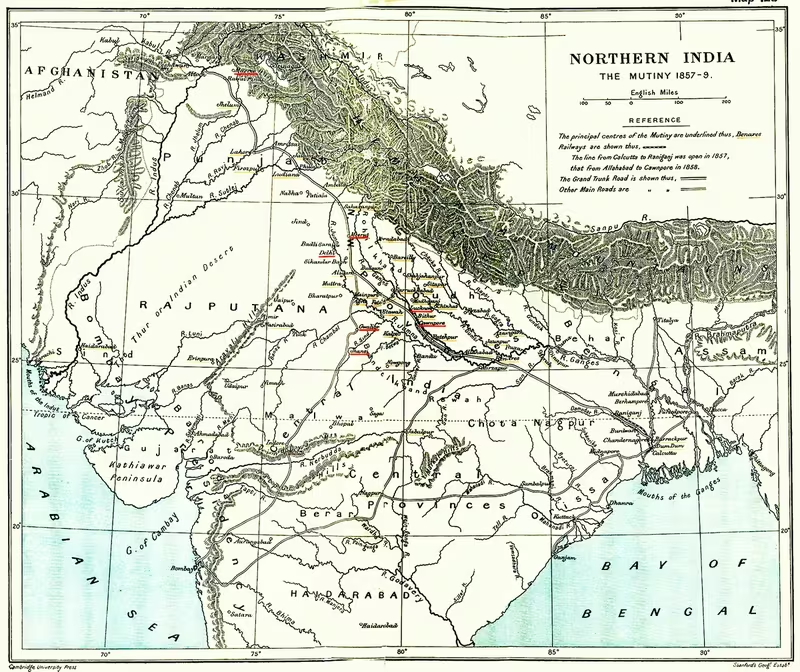
Indian Rebellion of 1857–1859: Map, Centres, Campaigns and Territories
Introduction
The Indian Rebellion of 1857 began at the East India Company's cantonment in Meerut on 10 May 1857 and reached Delhi within a day. The rebels' decision to place themselves under the nominal authority of the Mughal ruler Bahadur Shah Zafar transformed a military mutiny into a wider political and social crisis. From Delhi, the uprising spread through the upper Gangetic plain, Awadh, Bundelkhand, Bihar, and parts of central India, while other regions remained loyal or largely quiet.
This map follows the geography of that conflict: the movement of mutinous Bengal Army units, the spread of civilian resistance, the principal rebel-held areas, the sieges of Delhi and Lucknow, the fighting at Kanpur, Jhansi, Gwalior, Arrah, and other centres, and the British counteroffensive. It also shows why the rebellion failed to become a uniform all-India movement. The Bombay and Madras Presidencies remained largely calm, the Punjab supplied crucial soldiers and support to the British, and major princely states such as Hyderabad, Mysore, Travancore, and Kashmir did not join the revolt.
The principal military phase ran from May 1857 to the defeat of the rebels at Gwalior on 20 June 1858. The British government announced amnesty on 1 November 1858 for rebels not involved in murder, although hostilities were not formally declared over until 8 July 1859. The events are known by several names, including the Indian Rebellion of 1857, the Revolt of 1857, the Sepoy Mutiny, the Great Rebellion, and, in India and Pakistan, the First War of Indian Independence. The choice of name reflects continuing disagreement over the rebellion's scale, aims, and political character.
Historical Context
Company expansion before 1857
The East India Company had maintained trading establishments in India since the early seventeenth century, but its transformation into a territorial power accelerated after the Battle of Plassey in 1757. Its victory over the forces associated with Bengal's nawab gave the Company a firm foothold in eastern India. The Battle of Buxar in 1764 strengthened that position, and Mughal Emperor Shah Alam II granted the Company the right to collect revenue, or Diwani, in Bengal, Bihar, and Odisha.
The Company expanded from its bases in Bombay, Madras, and Bengal through war, annexation, and subsidiary alliances. The Anglo-Mysore Wars, fought between 1766 and 1799, and the Anglo-Maratha Wars, fought between 1772 and 1818, brought further territories under direct or indirect Company control. Governor-General Lord Wellesley promoted a policy under which Indian rulers accepted British protection, stationed Company troops, and surrendered control over external affairs.
The Anglo-Nepalese War of 1814–1816 ended with Nepal remaining independent but accepting a treaty and a British resident. It also marked the beginning of a close military relationship that included the recruitment of Gurkha soldiers into British service. After the First Anglo-Sikh War, the Treaty of Amritsar in 1846 transferred Kashmir to Gulab Singh and established the princely state of Jammu and Kashmir under the Dogra dynasty. The Second Anglo-Sikh War ended with the annexation of Punjab in 1849.
The Company placed Berar under British administration in 1853. In 1856, it annexed the kingdom of Oudh, also called Awadh, on the grounds of alleged misgovernment. By the eve of the rebellion, the Company exercised direct or indirect authority over most of the Indian subcontinent, although its control varied greatly between directly administered provinces, protected princely states, and territories governed through local elites.
Military grievances
The East India Company's armies were divided into the Bengal, Bombay, and Madras Presidency armies. Shortly before the rebellion, the Company employed more than 300,000 sepoys, compared with approximately 50,000 British soldiers. The Bengal Army was the largest and recruited heavily from high-caste Hindu communities, especially Brahmins, Rajputs, and Bhumihars from Awadh and Bihar. Muslims formed a larger proportion of its irregular cavalry units, while Hindus predominated in the regular infantry and cavalry.
The Bengal Army's recruitment pattern created a force with strong regional, caste, and religious connections. Many soldiers came from the same areas that were affected by the annexation of Awadh. The loss of privileges associated with the Awadh courts, together with fears of higher land-revenue demands, disturbed both sepoys and landed families.
Service conditions also changed. Annexations expanded the areas in which soldiers were expected to serve. The old expectation that certain Bengal soldiers would not be required to cross the sea was challenged by the General Service Enlistment Act of 25 July 1856. The act formally applied only to new recruits, but many serving soldiers feared that overseas service obligations would eventually be extended to them. Sea travel raised concerns about ritual pollution and the loss of caste status.
Sepoys also resented relatively low pay, the removal of extra allowances known as batta for service in territories that had been annexed, slow promotion based on seniority, and worsening relations with British officers. Many Indian officers reached commissioned rank only at an advanced age, if they reached it at all. The Bengal Army's earlier accommodation of religious and social practices had made soldiers particularly sensitive to any policy that appeared to threaten their ritual standing.
The cartridge controversy
The immediate flashpoint was the introduction of the Pattern 1853 Enfield rifle-musket. Its paper cartridges were greased to make loading easier. A soldier traditionally tore the cartridge open with his teeth before pouring the powder into the barrel. Rumours spread that the grease contained cow tallow, offensive to Hindus, and pig lard, offensive to Muslims.
The historical importance of the cartridge controversy lay in the belief that the cartridges were religiously polluting, not in secure proof that large numbers of such cartridges containing animal fat had actually been issued before the rebellion. The rumours gained force because they appeared to confirm wider fears about British intentions, missionary activity, social reform, and the erosion of established religious and social structures.
Company officials responded by supplying cartridges without grease and allowing soldiers to apply their own lubricant. The measure failed to restore confidence. For many sepoys, the response suggested concealment rather than reassurance. The cartridge became a symbol linking military grievances with anxieties about conversion, overseas service, pay, and British interference in Indian society.
Civilian discontent
Civilian participation varied sharply from region to region. In Awadh and Bihar, traditional landholders known as taluqdars played a major role. Company land-revenue policies had removed estates from many taluqdars and transferred land to peasant cultivators or other claimants. During the rebellion, taluqdars attempted to recover their former authority, often with the support of peasants connected to them through kinship and local loyalties.
Land-revenue assessments created further resentment. Debt and dispossession made moneylenders and Company officials targets of rural anger. In Awadh, Rajput taluqdars supplied important leadership. In Bihar, the eighty-year-old zamindar Kunwar Singh of Jagdishpur became a leading figure after his estate came under pressure from the Revenue Board.
Princes and chieftains also had varied responses. The Doctrine of Lapse denied recognition to adopted heirs in certain circumstances, and this threatened rulers such as Nana Sahib and the Rani of Jhansi. Rani Lakshmi Bai resisted British authority after the adopted son of her late husband was denied recognition as successor. Other rulers, especially where their privileges were not directly threatened, remained loyal.
Reformist measures added to suspicion. The abolition of sati and the legalisation of widow remarriage were interpreted by some Indians as attacks on traditional practices. British schools, secular education, Western science, and the education of girls also provoked opposition in some communities. The colonial justice system was widely viewed as biased, while reports of official brutality and economic hardship deepened distrust.
The resulting rebellion was not uniform. Even in rebellious districts, some communities remained quiet or supported the Company. Muzaffarnagar, near Meerut, benefited from a Company irrigation project and remained largely loyal despite its proximity to the uprising's starting point.
Territorial Extent and Boundaries
The geography shown by the map
The rebellion's principal zone extended across north-central India. Its strongest areas included:
- Meerut and Delhi in the upper Yamuna and western Gangetic region
- Awadh, centred on Lucknow
- Kanpur and the middle Ganges corridor
- Bundelkhand, including Jhansi and Kalpi
- Gwalior and adjoining parts of central India
- Western and central Bihar, especially the area around Arrah and Jagdishpur
- Parts of the Punjab and the North-Western Frontier where individual regiments or local groups rebelled
- Sambalpur and parts of Odisha
- Chittagong, Dhaka, and other locations in eastern India where mutinies occurred
- Gujarat and Kathiawar, where local landholders and armed communities resisted British authority
The map should not be read as showing a single continuous rebel state. Rebel control was strongest in particular towns, forts, districts, and rural zones. Lines of authority shifted rapidly. In several places, rebel leaders controlled a town while British forces retained or re-established communications nearby. In Awadh, resistance continued in the countryside long after major urban centres had been recaptured.
Northern frontier
The Punjab and the North-Western Frontier formed the northern military zone of the conflict. The region had been annexed after the Second Anglo-Sikh War in 1849 and contained large numbers of British and Indian troops. Mutinies occurred at places including Jhelum and Sialkot, but the Punjab did not join the rebellion as a unified political region.
Sikh and Pathan communities generally supported the British effort. Sikh rulers and military groups feared the restoration of Mughal authority in northern India because of earlier conflicts with the Mughal Empire. They also resented the Bengal Army's Purbiyas, or eastern soldiers, who had not always met Sikh forces in the Anglo-Sikh wars. The Punjab Movable Column, composed of British, Sikh, and Pashtun troops, became an important force in suppressing unrest and reinforcing the British position before Delhi.
At Peshawar, British officers intercepted sepoy correspondence and disarmed four Bengal Native regiments on 22 May 1857. The action prevented a larger mutiny in the garrison and encouraged local chieftains to support the British. Afghanistan remained neutral. The British considered offering Peshawar to Dost Mohammad Khan in return for assistance, but the proposal was rejected and Peshawar remained in British hands.
Eastern and southern limits
The Bengal Presidency, outside the principal centres of unrest, remained largely quiet. Mutinies and disturbances did occur in Chittagong, Dhaka, Jalpaiguri, and other places. In Chittagong, sepoys seized the treasury in September 1857 and later broke open the jail. Gurkha units eventually suppressed the mutiny.
The Bombay Presidency experienced three mutinies among its twenty-nine regiments. The Madras Army experienced no comparable general mutiny, although men in one of its regiments refused to volunteer for service in Bengal. Much of southern India remained passive, and territories associated with Hyderabad and Mysore did not join the rebellion.
In Odisha, Surendra Sai organised resistance in Sambalpur. His followers used the old fort and the surrounding forests, conducting hit-and-run warfare against British forces. The rebellion was gradually weakened by military pressure and shifting local alliances, but Surendra Sai did not surrender until May 1862, after a new policy promised amnesty.
Western and central zones
Gujarat and Kathiawar saw resistance led by landholding elites and armed groups, including Bhils, Kolis, Pathans, and Arabs. The Waghers revolted in Bet Dwarka and the Okhamandal region of the Kathiawar peninsula in January 1858. By July, they controlled the area. A joint British, Gaekwad, and princely-state offensive recaptured it by October 1859.
In central India, the most significant connected zone included Jhansi, Kalpi, and Gwalior. These areas were not governed as a single rebel kingdom. The Rani of Jhansi defended her state against neighbouring rulers, fought the British, and later joined Maratha rebels who captured Gwalior from the Scindia rulers, who were allied with the British.
Administrative Structure
The East India Company's political geography
On the eve of the rebellion, the East India Company governed India through a mixture of direct administration, military occupation, subsidiary alliances, annexation, and indirect control. The three Presidency administrations—Bengal, Bombay, and Madras—each maintained its own army. Their boundaries were administrative rather than cultural or geographical, and the loyalty of soldiers and civilians differed greatly from one region to another.
Directly administered territories included the Bengal Presidency, the North-Western Provinces, Awadh after its annexation in 1856, Punjab after 1849, and other acquired areas. Princely states retained local rulers but accepted British protection and surrendered control over external affairs. Hyderabad, Mysore, Travancore, Kashmir, and many Rajputana states remained outside the rebellion and supported or served the British in different ways.
The Company's government depended on district officials, revenue collectors, police, military cantonments, courts, and local intermediaries. Where these institutions collapsed, rebels often took over treasuries, jails, police stations, and revenue offices. In other places, Company officials escaped to forts or military cantonments and tried to restore administration through loyal troops.
Delhi and the Mughal court
Delhi became the rebellion's political centre because of its symbolic importance. It was the old Mughal capital and the residence of Bahadur Shah Zafar, whose authority had declined but whose name still carried prestige across northern India. When mutinous soldiers arrived from Meerut on 11 May, they asked the emperor to lead them. He initially hesitated but eventually accepted their allegiance.
Bahadur Shah Zafar was proclaimed Emperor of Hindustan. The proclamation did not create a centralised rebel government. The emperor's practical control over the mutineers was limited, and rebel commanders often acted independently. Bakht Khan was later appointed commander-in-chief, while the emperor's son Mirza Mughal proved unable to provide effective military leadership.
The Mughal connection nevertheless gave the uprising a language of political unity. Rebel proclamations invoked the emperor and called for the removal of foreign rule from India. At the same time, the allegiance of the Mughal emperor contributed to Sikh opposition, since many Sikhs did not want a return to Mughal authority.
Awadh and the countryside
Awadh was one of the most important regions on the map. Its annexation in 1856 affected the court, landed families, soldiers, and peasants. Many Bengal Army sepoys came from Awadh, and the removal of the nawab's government disrupted networks of patronage and privilege.
Lucknow became the principal urban centre of the rebellion in Awadh, but resistance extended far beyond the city. Taluqdars recovered estates, local leaders mobilised armed followers, and British forces faced scattered resistance after retaking Lucknow. Sir Colin Campbell's operations in 1858 were designed not merely to capture the city but to break the rural networks that sustained the rebellion.
Jhansi and princely authority
Jhansi was a Maratha-ruled princely state in Bundelkhand. After the death of its ruler without a biological male heir, the Company annexed the state under the Doctrine of Lapse. Rani Lakshmi Bai protested the denial of recognition to her adopted son.
When rebellion began, Jhansi's political situation became unstable. Company officials and their families sought refuge in Jhansi Fort. The Rani negotiated their evacuation, but the group was massacred after leaving the fort. British officials suspected the Rani of involvement, although she repeatedly denied responsibility and the historical circumstances remain contested.
The Rani later became the principal military leader of Jhansi. She defended the city against the forces of Datia and Orchha in late 1857 and fought the British in 1858. Her political authority came from the state, but her military activity became connected with the wider Maratha resistance in central India.
Infrastructure and Communications
Roads and military movement
Military movement depended on roads, rivers, cantonments, forts, and the ability to maintain communications between isolated garrisons. The Grand Trunk Road was strategically significant in the region around Allahabad, Fatehpur, and Kanpur. When British troops moved toward Kanpur, punitive operations along this route affected villages and communities suspected of supporting the rebellion.
The distance between Meerut and Delhi—approximately 40 miles, or 64 kilometres—helped determine the opening phase of the conflict. After the mutiny on 10 May, rebel soldiers travelled to Delhi during the night. Delhi was close enough to reach quickly and had the political authority associated with the Mughal court. The British made no effective attempt to intercept the column.
The route between Delhi and the east was equally important. Once Delhi was recaptured, Company forces created a continuous, though fragile, line of communication from the city toward Agra and Kanpur. This allowed the force that had taken Delhi to relieve the British position at Agra and then move toward Kanpur.
Telegraph and intelligence
Telegraph communication played a visible role during the first days of the rebellion. Telegraph operators at the Flagstaff Tower on Delhi's northern ridge sent news of the uprising to other British stations. The messages helped spread information about the fall of Delhi and the danger facing British officials and civilians.
Communication was also used to prevent mutiny. At Peshawar, British officers intercepted sepoy correspondence and stopped the coordination of a wider rising. The incident shows that the rebellion's geography was shaped not only by roads and troop movements but also by the ability of authorities to monitor or disrupt information.
Rivers and crossings
The Ganges, Yamuna, Ravi, Sutlej, and other rivers affected both military operations and escape routes. The British party leaving Kanpur in June 1857 attempted to reach boats on the Ganges for passage to Allahabad. The evacuation broke down amid firing, confusion, and violence at the riverbank.
During the campaign in Awadh in March 1858, a force under General Outram crossed a river using cask bridges. The crossing allowed artillery to fire from the flank and formed part of the methodical British advance on Lucknow. In Punjab, rebel sepoys fleeing after the uprising at Sialkot attempted to cross the Ravi River but were trapped on an island and defeated at Trimmu Ghat.
Railways and local transport
The extract identifies a British railway engineer, Mr. Boyle, among the defenders of Arrah and refers to the railway context of the region. It does not establish a complete railway network or describe its overall role in the rebellion. The map therefore treats transport as a combination of roads, rivers, cantonment routes, local supply lines, and the Grand Trunk Road rather than presenting a detailed railway map.
Economic Geography
Revenue and agrarian conflict
Revenue collection lay at the centre of Company administration. High assessments, the seizure of estates, and the role of moneylenders produced different forms of rural discontent. In Awadh and Bihar, taluqdars and zamindars used the rebellion to recover territory and influence. Peasants sometimes joined them because of kinship, local allegiance, or resentment of Company revenue arrangements.
The rebellion's rural geography was especially important in Awadh. British forces could recapture Lucknow, but the countryside continued to resist. The scattered nature of the resistance required repeated campaigns, local intelligence, and punitive expeditions. Heat, disease, and difficult terrain slowed British operations.
In Bihar, Kunwar Singh's estate at Jagdishpur was under pressure from the Revenue Board. His rebellion united local landed interests and armed followers. The defence of Arrah demonstrated how a small fortified position could control access to a district while larger rebel forces operated nearby.
Urban centres and treasuries
Urban centres were important because they contained arsenals, treasuries, jails, courts, administrative offices, and symbols of authority. At Delhi, the British officers in the arsenal opened fire when they feared that arms and ammunition would fall into rebel hands. They later blew up the arsenal, although rebels salvaged some weapons. A second magazine outside Delhi, containing up to 3,000 barrels of gunpowder, was captured without resistance.
In Chittagong, mutineers seized the treasury and released prisoners from the jail. In Shamli, rebels attacked the tahsil headquarters, burned government offices, and briefly disrupted British administration and supply routes. These events show how local control of fiscal and administrative buildings could be as important as control of a battlefield.
Markets and civilian violence
The rebellion disrupted bazaars, supply lines, and the movement of troops. At Meerut, unrest spread from the cantonment into the city, where buildings were burned and crowds attacked people associated with the Company. The relationship between military mutiny and civilian disorder varied by locality. Some outbreaks were led by sepoys, some by landholders, and some by urban or rural groups responding to local grievances.
Economic hardship also affected attitudes toward Company rule. Export-oriented trade practices and taxation were widely resented, while the decline or disruption of traditional industries contributed to wider dissatisfaction. The rebellion therefore moved through a landscape shaped by revenue offices, landholding patterns, market towns, military supply lines, and administrative centres.
Cultural and Religious Geography
Religious concerns and military identity
The cartridge rumours became powerful because they touched both Hindu and Muslim religious concerns. Cow fat was offensive to Hindus and pig fat to Muslims. The issue was not isolated from other fears. Soldiers worried that overseas service would pollute caste status, that missionaries signalled an official plan for conversion, and that social reforms were intended to undermine established religious structures.
The Bengal Army's recruitment geography reinforced the rapid spread of such fears. Many soldiers shared regional, caste, and religious backgrounds. Rumours could travel quickly through regiments whose members came from the same districts and maintained family connections with rural communities.
The rebellion did not divide neatly along religious lines. Many Hindu and Muslim sepoys fought together, and rebel appeals invoked the Mughal emperor. At the same time, Muslims and Hindus also fought for the British. Muslim scholars disagreed over whether British rule justified a declaration of jihad. Some, including Maulana Muhammad Qasim Nanautavi and Maulana Rashid Ahmad Gangohi, took up arms against colonial rule, while others supported the British or rejected calls for religious war.
Sikh and Muslim political memories
The Punjab's response reflected the region's recent history. Sikh communities remembered wars with the Mughal Empire and did not generally support a restoration of Mughal rule. Sikh and Pathan soldiers formed an important part of the British military response, especially in the Punjab Movable Column and the operations around Delhi.
This political geography complicates any simple division between Indian rebels and British forces. The Company's armies were largely Indian in composition. Indian soldiers fought on both sides, and local rulers made different choices according to their political interests, memories of earlier conflicts, and assessments of British power.
Delhi as a symbolic centre
Delhi's significance was political, cultural, and religious. Its walls, palace, mosques, markets, and Mughal court gave the rebellion a symbolic centre. The destruction that followed the British reconquest was therefore not only military. Neighbourhoods within range of British artillery were bombarded, houses of Muslim nobles were destroyed, and cultural and material possessions were looted.
The capture of Delhi also transformed the city's social order. Later historical work has argued that British perceptions of an Islamic role in the rebellion contributed to a shift in intellectual and economic power from Muslim to Hindu groups in the city's aftermath. The immediate result was the arrest and trial of Bahadur Shah Zafar, who was exiled to Rangoon and died there in 1862.
Military Geography
The Bengal Army
The Bengal Army was the rebellion's central military institution. It contained 74 regular Bengal Native Infantry regiments at the beginning of 1857. Fifty-four mutinied. Some were immediately destroyed or dispersed, while others were disarmed or disbanded. Only twelve of the original regular Bengal Native Infantry regiments survived into the new Indian Army.
All ten Bengal Light Cavalry regiments mutinied. The Bengal Army also included irregular cavalry and infantry. Some irregular units supported the Company, including three Gurkha and five of the six Sikh infantry units, as well as the six infantry and six cavalry units of the Punjab Irregular Force.
The rebellion's military geography was therefore shaped by the distribution of regiments. Units that mutinied often marched toward Delhi, Kanpur, or other centres. Those that were disarmed before mutiny could spread altered the balance in places such as Peshawar, Benares, Allahabad, and the Punjab.
Meerut and the opening movement
Meerut contained one of the largest British troop concentrations in India: 2,357 Indian sepoys, 2,038 British soldiers, and twelve British-manned guns. On 24 April, Lieutenant Colonel George Carmichael-Smyth ordered ninety soldiers of the 3rd Bengal Light Cavalry to accept the disputed cartridges. Eighty-five refused.
On 9 May, the eighty-five soldiers were court-martialled, stripped of their uniforms, shackled, and sentenced to imprisonment with hard labour. The public humiliation intensified resentment. On the evening of 10 May, the Indian troops broke into revolt, freed the imprisoned soldiers, attacked British officers and civilians, and moved toward Delhi.
The failure to pursue them allowed the rebels to reach the Mughal capital. The map's first major arrow therefore runs from Meerut to Delhi, a short movement that altered the political character of the conflict.
The Siege and fall of Delhi
The British counteroffensive developed slowly. Reinforcements had to move from Britain by sea, while units already in India were reorganised into field forces. British columns from Meerut and Simla eventually moved toward Delhi. Near Karnal, they joined and defeated the rebel army at Badli-ke-Serai, driving it back into the city.
The British established their main position on the Delhi Ridge to the north. The siege lasted approximately from 1 July to 21 September 1857. The encirclement was incomplete, and for much of the siege the besiegers were outnumbered. Rebel sorties continued, while disease and exhaustion threatened the British position.
The Punjab Movable Column reinforced the besiegers on 14 August. Heavy siege guns arrived in early September and opened breaches in the walls. The assault began on 14 September through the breaches and the Kashmiri Gate. British forces suffered heavy casualties, including John Nicholson, but held their position and fought through the city.
After a week of street fighting, British forces reached the Red Fort. Bahadur Shah Zafar had already fled to Humayun's Tomb. His sons Mirza Mughal and Mirza Khizr Sultan and his grandson Mirza Abu Bakr were shot near Delhi Gate by Major William Hodson. The city's fall became a decisive turning point, but it did not end the rebellion.
Kanpur and the Ganges corridor
At Kanpur, sepoys under General Wheeler rebelled in June 1857. Nana Sahib, aided by Azimullah Khan, led the rebels. The British defenders remained in an entrenchment for three weeks with limited food and water.
On 25 June, Nana Sahib offered safe passage to Allahabad. The British accepted, and the evacuation began on 27 June. At the river, firing broke out, boats were abandoned or burned, and many people were killed. Surviving women and children were held at the Bibighar and later murdered. The precise sequence and responsibility for the violence remain disputed in historical accounts, including testimony from Tatya Tope.
The killings at Kanpur hardened British attitudes and became a central justification for severe reprisals. British forces retook the city by mid-July. The route from Delhi through Agra to Kanpur then became a vital east-west communications line.
Lucknow and Awadh
The annexation of Awadh made Lucknow one of the most important centres of the rebellion. Sir Henry Lawrence fortified the Residency, where approximately 1,700 defenders held out against rebel attacks, artillery, musket fire, and attempts to breach the walls through tunnels. Lawrence was killed early in the siege.
A relief column under Sir Henry Havelock, accompanied by Sir James Outram, fought its way from Kanpur to Lucknow on 25 September. The force defeated larger rebel formations but could not evacuate the garrison. It joined the defenders instead.
A larger force under Sir Colin Campbell relieved the Residency in November. The defenders and non-combatants withdrew, first to Alambagh and then to Kanpur. Campbell returned in March 1858 with a large army and advanced methodically on Lucknow. A Nepalese contingent under Jung Bahadur Kunwar Rana supported the operation. The final fighting in the city took place on 21 March.
The capture of Lucknow did not immediately end resistance. Rebel groups dispersed into the Awadh countryside, where British forces spent the summer and autumn of 1858 confronting guerrilla warfare, disease, heat, and scattered local strongholds.
Jhansi, Kalpi, and Gwalior
In Bundelkhand, Jhansi became the military centre of resistance under Rani Lakshmi Bai. She successfully defended the city against the neighbouring rulers of Datia and Orchha in September and October 1857.
Sir Hugh Rose's Central India Field Force advanced on Jhansi in March 1858 after relieving Saugor. The Company army captured the city after a siege, and the Rani escaped in disguise. After further fighting at Jhansi and Kalpi, she joined Maratha rebels and moved toward Gwalior.
On 1 June 1858, Rani Lakshmi Bai and her allies captured Gwalior from the Scindia rulers, who supported the British. The capture briefly revived the rebellion's prospects in central India. The Central India Field Force advanced rapidly, however. Rani Lakshmi Bai died on 17 June, during the Battle of Gwalior. Company forces recaptured the city within the next three days.
Gwalior was the last major rebel defeat. Its fall on 20 June 1858 is the principal endpoint shown on the military campaign layer, although resistance continued elsewhere.
Bihar and the defence of Arrah
The Bihar rebellion centred on western districts and was led by Kunwar Singh, his brother Babu Amar Singh, and his commander Hare Krishna Singh. Mutiny broke out at Danapur on 25 July 1857 among the 7th, 8th, and 40th regiments of Bengal Native Infantry. The mutinous soldiers moved toward Arrah and joined Kunwar Singh.
At Arrah, eighteen civilians and fifty loyal sepoys defended a fortified outbuilding belonging to railway engineer Mr. Boyle. They faced an estimated 2,000 to 3,000 mutineers and rebels. A relief force from Danapur was ambushed on 29 July and defeated.
Major Vincent Eyre reached Buxar by river on 30 July. Ignoring orders not to advance, he marched toward Arrah with troops and artillery. His force was ambushed on 2 August but stormed the rebel positions. On 3 August, Eyre reached the siege house and relieved the defenders.
The Arrah campaign illustrates the importance of local strongholds, artillery, river transport, and the ability of small loyal forces to hold out until relief arrived.
Punjab and Trimmu Ghat
The Punjab did not experience a general unified rebellion, but individual uprisings occurred. At Jhelum, native troops fought British soldiers of the 24th Regiment of Foot on 7 July 1857. At Sialkot, most of a sepoy brigade rebelled on 9 July and attempted to move toward Delhi.
John Nicholson intercepted the sepoys near the Ravi River. After several hours of fighting, the rebels became trapped on an island. Three days later, 1,100 sepoys were defeated at Trimmu Ghat. The British recruitment of Sikh and Pashtun irregulars expanded greatly during the rebellion, and the Punjab supplied approximately 34,000 fresh levies for British service after the uprising began.
Other theatres
In Indore, sepoys in Holkar's army revolted on 1 July 1857. The Bhopal Contingent refused to follow Colonel Henry Durand's cavalry charge, and the Bhopal Infantry refused orders. Durand withdrew with British residents; thirty-nine British residents were killed.
In Gujarat and Kathiawar, the Waghers controlled Bet Dwarka and Okhamandal for part of 1858–59 before a joint offensive retook the region. In Sambalpur, Surendra Sai maintained guerrilla resistance in forested country after British forces captured villages and defeated major rebel positions. In Shamli, Chaudhary Mohar Singh led a local uprising that disrupted administration and supply routes before British troops retook the town.
Political Geography
A fragmented rebellion
The rebellion had no single command structure or universally accepted political programme. Bahadur Shah Zafar offered a symbolic centre, and many rebels invoked Mughal authority, but local leaders often pursued their own objectives. Nana Sahib led at Kanpur, Rani Lakshmi Bai at Jhansi, Kunwar Singh in Bihar, Bakht Khan around Delhi, and Surendra Sai in Sambalpur.
Some rebels sought the restoration of lost privileges; others opposed annexation, taxation, or British administration; many sepoys acted from military and religious grievances. In Awadh, the uprising acquired the character of a patriotic revolt against British oppression in some areas. Yet the rebel leaders did not issue a common constitutional programme or establish a stable new political system.
Princely states and alliances
The decisions of princely rulers shaped the map. Hyderabad, Mysore, Travancore, and Kashmir remained outside the rebellion and supported British interests. The smaller states of Rajputana also did not join the revolt. The Scindia rulers of Gwalior supported the British, although the city and fortress were captured by Rani Lakshmi Bai and Maratha rebels in June 1858.
Nepal remained independent and provided military assistance to the British through forces led by Jung Bahadur. Sikh and Pathan communities in the Punjab supported the British, while the Afghan ruler Dost Mohammad Khan remained neutral.
These alliances acted as what Governor-General Lord Canning called “breakwaters in a storm.” They prevented the rebellion from spreading uniformly across the subcontinent and supplied the British with soldiers, bases, communications, and political support.
Why the rebellion failed
Several factors limited the rebellion's success:
- Regional concentration: The strongest resistance remained in north-central India, while southern and western regions were largely calm.
- Divided armies: The Bombay and Madras armies did not follow the Bengal Army into general revolt.
- Indian support for the British: Sikh, Gurkha, Pathan, and other Indian troops formed a substantial part of the Company response.
- Fragmented leadership: Rebel leaders operated across separate regions without a unified command system.
- Competing political aims: Some leaders sought the restoration of dynastic rights, some opposed taxation or annexation, and others fought for local autonomy.
- British communications: Telegraphs, roads, river routes, and the line from Delhi through Agra to Kanpur helped the British reconnect their forces.
- Princely-state loyalty: Major states that remained loyal denied the rebels additional armies and resources.
The map's contrasting colours—rebel centres surrounded by loyal or contested territory—represent this fragmentation more accurately than a single solid front.
Legacy and Decline
The end of Company rule
The rebellion destroyed the East India Company's position as the sovereign power in India. The Government of India Act of 1858 transferred its governing authority to the British Crown. The Governor-General received the additional title of Viceroy, and the new India Office in London assumed responsibility for Indian policy.
Queen Victoria's proclamation of 1 November 1858 promised rights similar to those of other British subjects and declared a policy of religious tolerance. The British government abandoned further attempts to interfere directly with Indian religious practices and became more cautious about land and dynastic arrangements. The administration sought to preserve established hierarchies while incorporating Indian rulers and higher-status groups more closely into government.
The old bureaucracy largely remained, but the political relationship changed. Limited Indian participation in government created a new precedent. The expansion of universities at Calcutta, Bombay, and Madras helped produce a professional Indian middle class. The promise of equal access to public office, although only partially fulfilled, became a reference point for later Indian political movements.
Military reorganisation
The military changes were immediate and lasting. The old Bengal Army had almost disappeared through mutiny, disbandment, and reorganisation. The British reduced recruitment from groups they associated with the rebellion, including Brahmins, and increased recruitment among Sikhs, Gurkhas, and other communities classified by the colonial government as “martial races.”
The ratio of British to Indian soldiers increased. Indian artillery was largely replaced by British units, except for a few mountain batteries. The British also reorganised regiments under the irregular system, with fewer British officers and closer association between officers and soldiers. Indian officers received greater responsibility within units, although overall authority remained colonial.
These arrangements shaped the military organisation of British India into the early twentieth century.
Human cost and contested memory
The conflict produced widespread violence against civilians. Rebel attacks killed British officers, civilians, women, children, and Indian soldiers who remained loyal to the Company. British reprisals included mass executions, the destruction of villages, forced punishments, and the killing of suspected supporters. Delhi, Lucknow, Kanpur, and other cities suffered severe destruction.
Estimates for deaths vary. In Awadh alone, some estimates place the number of Indians killed at 150,000, including approximately 100,000 civilians. Approximately 6,000 of the 40,000 British people living in India were killed. These figures should be treated as estimates rather than exact totals.
British newspapers circulated exaggerated accounts of alleged rebel atrocities, especially allegations of rape. Later investigations found no convincing evidence for some of the most widely repeated claims. The stories nevertheless helped produce a British mood of vengeance and weakened support for clemency. The killings at Kanpur became a central symbol in British memory, while Indian memories emphasised annexation, land revenue, military discrimination, and the scale of British reprisals.
Historical interpretation
The rebellion's name remains contested. “Indian Mutiny” emphasises the role of sepoys and the failure of army discipline. “Great Rebellion” stresses the breadth of civilian participation. “First War of Indian Independence” highlights the rebels' use of Mughal authority, their opposition to foreign rule, and the participation of different communities in several regions.
Arguments against calling it a national war of independence point to the absence of a united Indian state, the participation of Indian soldiers on the British side, the rivalry among local rulers, the return of many mutineers to their homes, and the rebellion's concentration in north and central India. Arguments in favour point to the widespread character of the revolt in Awadh, Bundelkhand, and other regions; the repeated appeal to country-wide Mughal authority; and the effort to drive foreign rule from the India imagined by the rebels.
The map reflects both interpretations. It shows a military uprising that began in the Bengal Army, but it also shows civilian rebellions, landed resistance, princely grievances, local guerrilla warfare, and political appeals that went beyond individual regiments.
Geographic legacy
The rebellion permanently altered the political geography of South Asia. The Mughal dynasty ended with Bahadur Shah Zafar's exile. The East India Company disappeared as India's governing power. Direct Crown rule created the British Raj, while the princely states remained important components of the colonial political order.
The military corridors of 1857 also influenced later administration. Delhi, Lucknow, Kanpur, Jhansi, Gwalior, Arrah, Punjab, and other places became sites of memorialisation, military history, and nationalist memory. The routes of rebellion and counterattack remained part of the historical landscape long after the fighting ended.
The map's final date, 1859, acknowledges that the last major battle occurred at Gwalior in June 1858 but that resistance, including the campaign in Gujarat and the continuing struggle in other regions, extended beyond that date. The transition from Company rule to Crown rule was therefore not a single moment of military surrender. It was a process of reconquest, administrative reorganisation, political negotiation, and changing interpretations of Indian sovereignty.
Map Reading Guide
Use the map to follow the conflict in five stages:
- Meerut to Delhi: The mutiny of 10 May 1857 and the rebel march to Delhi on 11 May.
- Expansion through north-central India: The spread into Awadh, Kanpur, Bundelkhand, Bihar, and neighbouring districts.
- British recovery: The reinforcement of Delhi, the siege and fall of the city, and the restoration of communications toward Agra and Kanpur.
- Campaigns of 1858: The reconquest of Lucknow, the campaigns in Jhansi and Kalpi, and the capture of Gwalior.
- Scattered resistance: Rural warfare in Awadh, Bihar, Punjab, Gujarat, Odisha, and other regions after the main urban centres had been retaken.
The coloured zones indicate relative political and military control rather than fixed national borders. Boundaries shifted, and many districts contained both rebel and loyal communities. The rebellion was a connected crisis, but it was not governed by a single state or army. Its geography is best understood as a network of cantonments, cities, forts, roads, rivers, estates, princely territories, and rural communities whose loyalties changed during the conflict.